Food origin … (and the ranting of a crazy person)
Most people are aware that French Fries are not from France, Cornish Game Hens are not imported from Cornwall, England and that “Danish” pastry originated in Vienna (It’s true, really). One of the few foods that HAS been properly designated by its origin is the Belgian Waffle, for it does, in fact, come from Belgium. However, if you ask for a Belgian Waffle at a café in Antwerp, no one will understand what you are talking about… and probably mistake you for the town crazy.
You see, there are many different waffles made in Belgium. What we silly Americans think of as the quintessential “Belgian Waffle”, is actually a ‘Brussels’ Waffle, as opposed to a ‘Liège’ Waffle, which is also a Belgian Waffle, and quite delicious I might add, with it’s crunchy brûlée exterior. But that is another post.
Getting back to the Brussels “Belgian” Waffle –
By definition, the Brussels Waffle is a yeasted dough that is baked in a deep grid rectangular iron (American - Belgian waffle irons are the wrong shape; being split into 2 squares) characteristically crispy on the outside and light and fluffy on the inside.
The Liège Waffle, on the other hand, contains pearl sugar (which is hard to find in U.S.) and is baked in a sort of oval shape. It’s much denser and has mini-chunks of "carameled" sugar dispersed throughout.
OK, so you are probably asking yourself, "Why is he being so OCD about this whole "Belgian" Waffle scandal?
Well I was offended earlier today, by a Food Network chef, who shall remain nameless, when I went hunting for ideas of what to serve on the Brussels Waffles that I am taking to work tomorrow for our IS/IT Breakfast. I came across a “Classic Belgian Waffle” recipe. Which is all fine and dandy, but when I clicked the link to see how they were presented and I saw the ingredient list to the actual waffle, I became enraged. There listed 2nd was the infamous "Baking Powder" and not one freeze dried granual of yeast was to be found in the whole recipe. NO yeast… !?!.... Nuh Uh!
This is called "American" waffle batter and there is nothing “Classically Belgian” about THAT… The batter's light sourness from the yeast counterpointed by the faint sweetness is missing. The texture may be crisp, but the interior is more rubbery. In fact, the final product is nothing but an American waffle with a deeper grid… Sadly lacking the refined flavor of a true Brussels "Belgian" waffle. Not that I am knocking American waffles either... but the batters are better suited to "standard" smaller grid irons. I wont touch on Danish Waffle irons, or Dutch irons in this post.
The point I am trying to make in my rambling, is that just because you slap American Waffle batter into a deep grid waffle iron (let me restate that the “Belgian” irons available in the U.S. are shaped wrong anyway) does NOT make it a Belgian waffle; Brussels, Liège or otherwise…
FOR SHAME ON YOU!!!! BAD, Food Network Chef!!!! BAD!!! Go to your ‘Walk In’ and THINK about what you have done…!!!!!
Suffering the American people to culinary mediocrity... And maligning the name of "Belgian" (even though misnamed) Waffle... For Shame!!! I will not be eating breakfast in YOUR restaurant any time soon.
At this point, I was beginning to wonder just how far this sort of thing had gone.... So, I looked at a "Belgian" Waffle mix while at the store this evening picking up some fresh berries... Sure enough... BELGIAN WAFFLE MIX.... Right on the ingredient list "Baking Powder".....!!!!! Apparently this is a rampantly growing phenomenon. Blatant false advertising. Oh, and, of course, it was TWICE the price of any other waffle/pancake mix on the aisle. I was wondering how they could possibly contend that their mix tasted anything like a real Brussels Waffle... Then as I kept reading past all the chemicals to prevent clumping and to preserve freshness, at the very bottom I saw the answer....
Artificially Flavored... Lovely.... gack!!!
So friends, I urge you... No, I implore you, please... If you have ever ordered a "Belgian" waffle and were terribly UN-impressed, or decided that you didn't like them, please, please, try this recipe before you pass your final verdict.
 Gaufre de Brussels with Creme Violette whipped cream and candied violets
1 package active dry yeast
1/2 cup warm milk (105 to 110 degrees)
2 1/2 cups flour
1/3 cup sugar
1/2 teaspoon salt
2 eggs, separated
1 1/2 cups lukewarm milk (105 to 110 degrees)
1 teaspoon vanilla extract
8 TB butter, melted and cooled
Sprinkle yeast over the 1/2 cup warm milk in a small bowl; set aside about 5 minutes to wake up.
 In a large bowl, whisk flour, sugar and salt together.
 Lightly beat the egg yolks with a fork in a small bowl
 In another small bowl or glass pitcher mix 1 1/2 cups warm milk with vanilla
 Add melted Butter,
 then add the beaten egg yolks.
 Add butter/milk/yolk mixture to the flour/sugar mixture, beat until smooth.
 By now your yeast should be good and bubbly; Stir it down to get it well dispersed though the milk.
 Then stir the yeasted milk into the batter.
 Beat egg whites until soft peaks form;
 fold gently into batter. (That wire whisk is REALLY old, my grandmother still uses one just like it, my dad fixed this one for me by adding a new handle to it)
 Cover and refrigerate overnight. If you want to make them now you can leave it out on the counter for about 1 1/2 hours until doubled in volume, but the flavor is better if refrigerated overnight.
 Preheat an electric waffle maker. (Plastic housed waffle irons do not get hot enough to properly cook a waffle)
 Remove from refrigerator and stir down batter.
 Spoon about 1/2 cup batter into each waffle grid and use the back of a spoon or an icing spatula to spread over the grids a little.
 Close iron; cook until waffle is well-browned and the waffle is no longer steaming (about 4 to 5 minutes).
Transfer cooked waffles to a wire rack and keep warm in an oven, set to 200 degrees, until all the batter has been cooked.
 Makes 10 waffles. (that's 5 double squares by American Belgian irons)
Look, Even I can make a mess when I am not paying attention... LOL
 Serving Ideas -
UPDATE: Now that the IS/IT breakfast is over, I can post a few of the pics that I was able to take before fork hit mouth.. (Which was lightning fast by the way - I swear, we need a sign over our area "IS/IT, will Work for Food")
I happened to noticed that my fellow computer geeks' personalities were coming out as the added toppings... I guess you can tell a lot about a person from their Waffles.....
The Reserved Waffle.
 The Buried Berry Waffle.
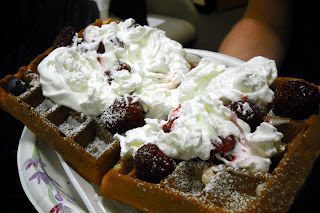 The Berry Lover waffle
 The "I forgot to shake the Whipped Cream Canister" Waffle.
 and the Nutella Nut Waffle...
 Good Times....
Mangia!!
~~

Most people are aware that French Fries are not from France, Cornish Game Hens are not imported from Cornwall, England and that “Danish” pastry originated in Vienna (It’s true, really). One of the few foods that HAS been properly designated by its origin is the Belgian Waffle, for it does, in fact, come from Belgium. However, if you ask for a Belgian Waffle at a café in Antwerp, no one will understand what you are talking about… and probably mistake you for the town crazy.
You see, there are many different waffles made in Belgium. What we silly Americans think of as the quintessential “Belgian Waffle”, is actually a ‘Brussels’ Waffle, as opposed to a ‘Liège’ Waffle, which is also a Belgian Waffle, and quite delicious I might add, with it’s crunchy brûlée exterior. But that is another post.
Getting back to the Brussels “Belgian” Waffle –
By definition, the Brussels Waffle is a yeasted dough that is baked in a deep grid rectangular iron (American - Belgian waffle irons are the wrong shape; being split into 2 squares) characteristically crispy on the outside and light and fluffy on the inside.
The Liège Waffle, on the other hand, contains pearl sugar (which is hard to find in U.S.) and is baked in a sort of oval shape. It’s much denser and has mini-chunks of "carameled" sugar dispersed throughout.
OK, so you are probably asking yourself, "Why is he being so OCD about this whole "Belgian" Waffle scandal?
Well I was offended earlier today, by a Food Network chef, who shall remain nameless, when I went hunting for ideas of what to serve on the Brussels Waffles that I am taking to work tomorrow for our IS/IT Breakfast. I came across a “Classic Belgian Waffle” recipe. Which is all fine and dandy, but when I clicked the link to see how they were presented and I saw the ingredient list to the actual waffle, I became enraged. There listed 2nd was the infamous "Baking Powder" and not one freeze dried granual of yeast was to be found in the whole recipe. NO yeast… !?!.... Nuh Uh!
This is called "American" waffle batter and there is nothing “Classically Belgian” about THAT… The batter's light sourness from the yeast counterpointed by the faint sweetness is missing. The texture may be crisp, but the interior is more rubbery. In fact, the final product is nothing but an American waffle with a deeper grid… Sadly lacking the refined flavor of a true Brussels "Belgian" waffle. Not that I am knocking American waffles either... but the batters are better suited to "standard" smaller grid irons. I wont touch on Danish Waffle irons, or Dutch irons in this post.
The point I am trying to make in my rambling, is that just because you slap American Waffle batter into a deep grid waffle iron (let me restate that the “Belgian” irons available in the U.S. are shaped wrong anyway) does NOT make it a Belgian waffle; Brussels, Liège or otherwise…
FOR SHAME ON YOU!!!! BAD, Food Network Chef!!!! BAD!!! Go to your ‘Walk In’ and THINK about what you have done…!!!!!
Suffering the American people to culinary mediocrity... And maligning the name of "Belgian" (even though misnamed) Waffle... For Shame!!! I will not be eating breakfast in YOUR restaurant any time soon.
At this point, I was beginning to wonder just how far this sort of thing had gone.... So, I looked at a "Belgian" Waffle mix while at the store this evening picking up some fresh berries... Sure enough... BELGIAN WAFFLE MIX.... Right on the ingredient list "Baking Powder".....!!!!! Apparently this is a rampantly growing phenomenon. Blatant false advertising. Oh, and, of course, it was TWICE the price of any other waffle/pancake mix on the aisle. I was wondering how they could possibly contend that their mix tasted anything like a real Brussels Waffle... Then as I kept reading past all the chemicals to prevent clumping and to preserve freshness, at the very bottom I saw the answer....
Artificially Flavored... Lovely.... gack!!!
So friends, I urge you... No, I implore you, please... If you have ever ordered a "Belgian" waffle and were terribly UN-impressed, or decided that you didn't like them, please, please, try this recipe before you pass your final verdict.
Brussels (Belgian) Waffles
 Gaufre de Brussels with Creme Violette whipped cream and candied violets
 1 package active dry yeast
1/2 cup warm milk (105 to 110 degrees)
2 1/2 cups flour
1/3 cup sugar
1/2 teaspoon salt
2 eggs, separated
1 1/2 cups lukewarm milk (105 to 110 degrees)
1 teaspoon vanilla extract
8 TB butter, melted and cooled
Sprinkle yeast over the 1/2 cup warm milk in a small bowl; set aside about 5 minutes to wake up.
 In a large bowl, whisk flour, sugar and salt together.
 Lightly beat the egg yolks with a fork in a small bowl
 In another small bowl or glass pitcher mix 1 1/2 cups warm milk with vanilla
 Add melted Butter,
 then add the beaten egg yolks.
 Add butter/milk/yolk mixture to the flour/sugar mixture, beat until smooth.
 By now your yeast should be good and bubbly; Stir it down to get it well dispersed though the milk.
 Then stir the yeasted milk into the batter.
 Beat egg whites until soft peaks form;
 fold gently into batter. (That wire whisk is REALLY old, my grandmother still uses one just like it, my dad fixed this one for me by adding a new handle to it)
 Cover and refrigerate overnight. If you want to make them now you can leave it out on the counter for about 1 1/2 hours until doubled in volume, but the flavor is better if refrigerated overnight.
 Preheat an electric waffle maker. (Plastic housed waffle irons do not get hot enough to properly cook a waffle)
 Remove from refrigerator and stir down batter.
 Spoon about 1/2 cup batter into each waffle grid and use the back of a spoon or an icing spatula to spread over the grids a little.
 Close iron; cook until waffle is well-browned and the waffle is no longer steaming (about 4 to 5 minutes).
Transfer cooked waffles to a wire rack and keep warm in an oven, set to 200 degrees, until all the batter has been cooked.
 Makes 10 waffles. (that's 5 double squares by American Belgian irons)
Look, Even I can make a mess when I am not paying attention... LOL
 Serving Ideas -
 - Orange Blossom Honey Butter (1 cup butter, 3 TB Orange Blossom Honey; Beat together until light & fluffy)
- Whipped Cream (your choice of Liqueur Flavoring)
- Confectioners' Sugar
- Maple Syrup
- Fresh Berries and Whipped Cream or Confectioners' Sugar
- Bacon or Bacon and Maple Syrup
- MMM or spread with Nutella
UPDATE: Now that the IS/IT breakfast is over, I can post a few of the pics that I was able to take before fork hit mouth.. (Which was lightning fast by the way - I swear, we need a sign over our area "IS/IT, will Work for Food")
I happened to noticed that my fellow computer geeks' personalities were coming out as the added toppings... I guess you can tell a lot about a person from their Waffles.....
The Reserved Waffle.
 The Buried Berry Waffle.
 The Berry Lover waffle
 The "I forgot to shake the Whipped Cream Canister" Waffle.
 and the Nutella Nut Waffle...
 Good Times....
Mangia!!
~~


