
Wednesday, August 22, 2012
Thursday, August 9, 2012
Béchamel Bliss - Moussaka
OK, I will admit it... When I was a child, I hated Eggplant. Loathed, detested and abhorred it. Unfortunately for me, my mother absolutely loved the it. So much so, in fact, that we grew the vile vegetable in the garden every single year. Eggplant here, eggplant there.. Eggplant everywhere! Nightmares, where I was eaten my a giant eggplant, occurred quite frequently...
Did I mention that I reviled Eggplant?
I tried to explain to my mother that since I actually liked Brussels Sprouts, Broccoli and Spinach, that I should not be forced to consume eggplant. Unfortunately, this bit of logical thinking was not in sync with my mother's belief in a well rounded diet. In protest, I would shun the vile vegetable on my plate; refusing to submit to her dictatorial edict. This battle of wills would last several hours. Abandoned by the rest of the family, I would continue to sit at the table with that repugnant rutabaga wannabe mocking me from my plate.
Looking back, I realize that there was no possible way I could have ever won the war. True to rights, after about 2 hours of staunch rebellion, I would finally give in and eat the noxiously nauseating and nefarious nightshade. (sigh)
Now that I'm an adult, I have come to regret some of my childhood willfulness, (not all of it, mind you) for it wasted a lot of my time, energy, and, as it turns out, delicious eggplant. Yes, I said it. Eggplant... I don't know when it happened or how it happened, but I just can't seem to get enough of it these days.
Personally, I think they have hybridized newer cultivars or improved old ones over the years. Mom use to religiously salt the stuff and let it drain to remove the bitterness, yet it was still bitter and nasty when I was a kid. Now, I find that salting removes the bitterness completely and, in some cases, salting isn't even necessary. Thus, I have enjoyed many an Eggplant Rolatini, Eggplant Parmesan, Eggplant Charlotte, Eggplant Tempura and bountiful bowls of Ratatouille over the years. But my all time favorite Eggplant dish has got to be Moussaka.
Even during my strained childhood relationship with Eggplant, I would always eat the Moussaka when mom made it. She did resort to pureeing it the first couple of times, so I could not try to pick the eggplant out, (clever, she was) but in the long run it didn't matter. She figured out fairly quickly that it was the ONE Eggplant dish that I would eat with no dinnertime defiance.
I think this was the very first Greek dish I was exposed to, though the origins of Moussaka as "Greek" are somewhat dubious at best. More than likely, the dish is a spin-off of the Palestinian Musakhkan or the Turkish Musakka, for even on the Grecian peninsula, it is made differently according to locale... In Macedonia, for instance, they layer Beef and Potatoes, then top it with a savory custard instead of Lamb and Eggplant with Béchamel.
Either way, the version that we know today, and the one than I bake, became popular until the 1920's thanks to Nicholas Tselemente. I am assuming, since he was French, that the Béchamel topping is his doing, since I have seen some old recipes that use a yogurt and olive oil sauce on top with Kefalotyri, instead of Kasseri. But, let us be reminded that this is really a peasant dish, like Ratatouille, and as such, it manifests with multiple modifications made by anybody and everybody that has ever prepared it over the years. In essence, there is no wrong way or right way to make Moussaka. You can make it all kinds of "snooty" if you want, but in the grand scheme of things, it's just down home, stick to your ribs, Mediterranean comfort food.
Me? I am all for the Béchamel, man. If ever there was a food that instilled rapture, it's cheese laced Béchamel.
 Roasted Eggplant:
2 medium Eggplant, peeled and cut into 3/8 inch (10mm) slices
Olive Oil
Kosher Salt
Black Pepper
Béchamel:
2 TB unsalted Butter
2 TB AP Flour
2 cups (475ml) Whole Milk (room temperature)
Black Pepper
2 large Eggs
Meat Sauce:
A good glurg of Olive oil
1 1/2 lb (680g) ground Lamb (or Beef, but it really looses something)
1 large Onion, chopped
Black Pepper
1/4 tsp Cinnamon
1/2 tsp dried Oregano
1/4 tsp dried Basil
1/2 tsp Kosher Salt
2 TB Flat Leaf Parsley, chopped
3/4 cup Tomato Sauce
Assembly:
Meat Sauce
Roasted Eggplant
1 1/4 cup (5 oz) (140g) Kasseri cheese, grated
Béchamel
1/2 cup (2 oz) (57g) Parmigiano-Reggiano (or Myzithra)
Preheat the oven to 425 F degrees.
Peel the Eggplants and cut into slices of about 1/4-1/2 inch (10 mm).
 Place on a large baking sheet and brush both sides of the eggplant slices with olive oil (don't be stingy with the oil, they will soak up a lot)
 Season with Kosher Salt and Black Pepper.
 Bake for 10-15 minutes, until eggplant slices just begin to brown.
 Remove from the oven and allow to cool.
Reduce the oven to 350 F degrees.
While the Eggplant is baking, you can start the Béchamel.......
Melt the butter in a medium saucepan set over medium-low flame.
 Once the butter is melted, add the Flour,
 Whisk vigorously and constantly, cooking for one minute; until nice and bubbly (you only want a blonde roux)
 Slowly pour in the milk, again whisking constantly to that the sauce remains smooth.
 Continue cooking, whisking constantly.......
 until it coats the back of a spoon, then remove from the flame.
 Beat two eggs in a small bowl.
 Condition the beaten Eggs by whisking in several spoonfuls of the hot Béchamel.
 Then add the Eggs to the Béchamel sauce and whisk thoroughly until well combined.
 Cover with plastic wrap on the surface to prevent crusting and set aside.
 Now it's time for the meat sauce....
Heat Olive oil in a saute pan over medium flame.
 Add the Onions and saute about 2 minutes before adding the Lamb (my lamb was pretty lean this time)
 Once everything is nice and evenly browned and the onions are soft, add in the Black Pepper, Cinnamon, Oregano, Basil and Salt.
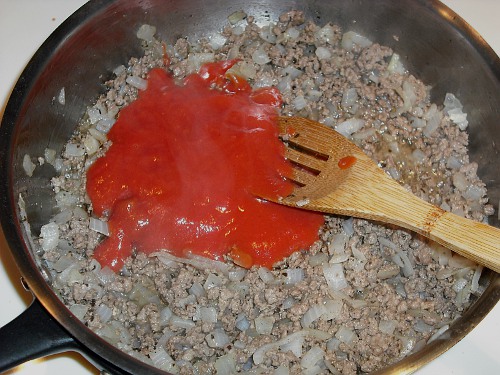
 Add the Tomato sauce and bring to a simmer for 5 minutes.
 Add the Parsley and simmer for an additional 5 minutes.
 Remove from the flame and prepare for assembly......
Assemble:
Place 1/3 of the meat mixture in the bottom of a 9x13 pan.
 Cover the meat by laying down 1/2 of the Eggplant slices.
 Sprinkle this with about 1/2 cup of the Kasseri cheese.
 Spoon 1/2 of the remaining meat mixture over the cheese.
 Cover this with the remaining Eggplant slices.
 Sprinkle with another 1/2 cup of Kasseri Cheese.
 Spoon the remaining meat mixture over the cheese.
 Now the best part, remove the plastic wrap from the Béchamel, and pour it all over the top. (It's a beautiful thing)
 Smooth with a rubber spatula if necessary.
 Sprinkle the remaining Kasseri over the Béchamel, then sprinkle with the Parmigiano-Reggiano.
 Bake for 40-45 minutes, until the top is golden brown.
 Let stand on the counter for about 15 minutes before attempting to cut into it.
Oh yea! THAT'S what I'm talkin' 'bout!
 Mangia!!
~~
Did I mention that I reviled Eggplant?
I tried to explain to my mother that since I actually liked Brussels Sprouts, Broccoli and Spinach, that I should not be forced to consume eggplant. Unfortunately, this bit of logical thinking was not in sync with my mother's belief in a well rounded diet. In protest, I would shun the vile vegetable on my plate; refusing to submit to her dictatorial edict. This battle of wills would last several hours. Abandoned by the rest of the family, I would continue to sit at the table with that repugnant rutabaga wannabe mocking me from my plate.
Looking back, I realize that there was no possible way I could have ever won the war. True to rights, after about 2 hours of staunch rebellion, I would finally give in and eat the noxiously nauseating and nefarious nightshade. (sigh)
Now that I'm an adult, I have come to regret some of my childhood willfulness, (not all of it, mind you) for it wasted a lot of my time, energy, and, as it turns out, delicious eggplant. Yes, I said it. Eggplant... I don't know when it happened or how it happened, but I just can't seem to get enough of it these days.
Personally, I think they have hybridized newer cultivars or improved old ones over the years. Mom use to religiously salt the stuff and let it drain to remove the bitterness, yet it was still bitter and nasty when I was a kid. Now, I find that salting removes the bitterness completely and, in some cases, salting isn't even necessary. Thus, I have enjoyed many an Eggplant Rolatini, Eggplant Parmesan, Eggplant Charlotte, Eggplant Tempura and bountiful bowls of Ratatouille over the years. But my all time favorite Eggplant dish has got to be Moussaka.
Even during my strained childhood relationship with Eggplant, I would always eat the Moussaka when mom made it. She did resort to pureeing it the first couple of times, so I could not try to pick the eggplant out, (clever, she was) but in the long run it didn't matter. She figured out fairly quickly that it was the ONE Eggplant dish that I would eat with no dinnertime defiance.
I think this was the very first Greek dish I was exposed to, though the origins of Moussaka as "Greek" are somewhat dubious at best. More than likely, the dish is a spin-off of the Palestinian Musakhkan or the Turkish Musakka, for even on the Grecian peninsula, it is made differently according to locale... In Macedonia, for instance, they layer Beef and Potatoes, then top it with a savory custard instead of Lamb and Eggplant with Béchamel.
Either way, the version that we know today, and the one than I bake, became popular until the 1920's thanks to Nicholas Tselemente. I am assuming, since he was French, that the Béchamel topping is his doing, since I have seen some old recipes that use a yogurt and olive oil sauce on top with Kefalotyri, instead of Kasseri. But, let us be reminded that this is really a peasant dish, like Ratatouille, and as such, it manifests with multiple modifications made by anybody and everybody that has ever prepared it over the years. In essence, there is no wrong way or right way to make Moussaka. You can make it all kinds of "snooty" if you want, but in the grand scheme of things, it's just down home, stick to your ribs, Mediterranean comfort food.
Me? I am all for the Béchamel, man. If ever there was a food that instilled rapture, it's cheese laced Béchamel.
Mom's Moussaka

2 medium Eggplant, peeled and cut into 3/8 inch (10mm) slices
Olive Oil
Kosher Salt
Black Pepper
Béchamel:
2 TB unsalted Butter
2 TB AP Flour
2 cups (475ml) Whole Milk (room temperature)
Black Pepper
2 large Eggs
Meat Sauce:
A good glurg of Olive oil
1 1/2 lb (680g) ground Lamb (or Beef, but it really looses something)
1 large Onion, chopped
Black Pepper
1/4 tsp Cinnamon
1/2 tsp dried Oregano
1/4 tsp dried Basil
1/2 tsp Kosher Salt
2 TB Flat Leaf Parsley, chopped
3/4 cup Tomato Sauce
Assembly:
Meat Sauce
Roasted Eggplant
1 1/4 cup (5 oz) (140g) Kasseri cheese, grated
Béchamel
1/2 cup (2 oz) (57g) Parmigiano-Reggiano (or Myzithra)
Preheat the oven to 425 F degrees.
Peel the Eggplants and cut into slices of about 1/4-1/2 inch (10 mm).


Reduce the oven to 350 F degrees.
While the Eggplant is baking, you can start the Béchamel.......
Melt the butter in a medium saucepan set over medium-low flame.


Heat Olive oil in a saute pan over medium flame.


Assemble:
Place 1/3 of the meat mixture in the bottom of a 9x13 pan.


Oh yea! THAT'S what I'm talkin' 'bout!
~~
Thursday, August 2, 2012
Coffee Talk - Cory Vacuum Pot (The Vac-u-lator)
I was riffling through the "Coffee Talk" posts of the past the other day and I realized, with some distress I might add, that I have never ever divulged my absolute most favorite way to make coffee.
The "Vaculator", or what is more commonly referred to as Vacuum pot or Siphon pot.
To me, this is the epitome of home coffee brewing. Sure, the Moka pot makes a nice cup of near espresso, and the French Press makes a deliciously rich cup of "joe" to accompany your dessert. I can even say, with no small amount of conviction, that "pour over drip" (though Chemex brewing takes some degree of finesse to perfect) is quite delicious. In fact, there are several brewing methods that produce delicious coffee, but I think vacuum brewing beats them all.
I think the reason I have never mentioned it before, is that I have taken it for granted over the years. You see, I have a Bodum Electric Santos (Sold under the Starbucks Utopia label back in 1999) that was gifted to me by a friend when I helped him move. I had never seen a vacuum pot before, but once I brewed coffee in it, the auto drip I had been using quickly went bye-bye, for it brewed a vastly superior cup of coffee. One that truly lived up to the label on the pot. For that first cup was "Utopia".
 It's 13 years later and I still use this pot every single day. I absolutely LOVE it. Though that love has been strained twice in the last decade... The nylon filter eventually "wears out" or tears and needs to be replaced. They only cost $4.50, so it's not a monetary issue so much as it is the fact that the Bodum site always lists them as being "on back order". I have had to wait up to 3 months to get a replacement filter... Luckily I have a French Press and a Corningware Drip-O-Lator waiting in the wings to pick up the slack. Lesson learned. NOW I am prepared for any unforeseen tearing or clip breakage by having 2 extra filters hiding in my pantry.
There is only 1 coffee pot that I can think of that brews a better cup of coffee.... and that would be this art deco era beauty right here.
 A vintage 1930's Cory Glass Vacuum Pot with a glass filter rod. So classic in style, and so inspired in functionality. No plastic, no cloth, no paper, no metal.... Absolutely nothing to interfere with the volatile oils of the extracted coffee. Just water, coffee grounds and inert glass. It is truly a beautiful thing.
Sadly, the Cory company went defunct decades ago. (though Silex made these as well) The reason was two fold... First there was the rise of the Auto Drip coffee maker. Let's face it, automatic brewing machines are a lot easier to use than a manual stove top coffee maker. I don't know about you, but personally; there is NO WAY that I am capable of manually making coffee in the morning... It's like Dawn of the Dead around here until the first cup of coffee has been consumed.
While I have no doubt that auto-brewing was at least partially responsible, I believe the main reason for the demise of the vacuum brewer was that it's greatest attribute was also it's greatest weakness.....It's made of glass; completely from glass. Even though it's made of Pyrex's borosilicate heat resistant glass which is virtually impervious to thermal shock, it's not resistant to shocks in the kitchen. One false move with the siphon tube while cleaning the upper bowl and you have a lovely pile of coffee ground covered shards in your sink. But for me, the superior quality of the finished brew far outweighs the extra care that is needed during clean up.
My vacuum pot is significantly older than I am.... Actually, it's significantly older than my parents too. As a result of it's advanced age the rubber seal on the upper bowl has become hard as a rock. It softens to a more pliable state once it has been warmed, but it still doesn't form a good seal anymore...It IS 75-80 years old after all. There is an online source (DaySeal) where you can order new gaskets for $25, but I figured out a temporary fix. So, if you happen to have one of these pots and the gasket is hard (not cracked) then I am going to show you a little trick to make your pot work almost like new. After all, it is a sad thing to leave one of these beauties boxed away and unable to fulfill it's coffee brewing destiny.
All you need are 3 Rubber bands from Asparagus you bought this last spring. (you save your produce rubber bands, right?)
 Oh, you don't like asparagus? What a shame that is. Oh well, I guess that means there is more for me. ;) OK, grab 3 thick produce type rubber bands (I know they use them on leek bundles too)
Slide one of them over the gasket and move it up towards the point where the upper part of the gasket touches the bottom of the bowl. (It is important not to twist the rubber band in any way)
 Gently guide it over the edge of the gasket and down in between the bowl and the top of the gasket.... This will form your upper seal.... (this is also why it is important not to let the rubber band get twisted... It needs to be nice and flat to form a seal)
 Now take the other two rubber bands and place them around the ridges on the lower part of the gasket. (Again, do not twist the rubber bands)
 There! You have just reconditioned your gasket for use. I guarantee you can now use that old vacuum pot (at least for a little while) without shelling our $25 for a new gasket. Just watch....
Fill the bottom pot with water, no higher than the DRL printed on the bottom pot... In my case, this is the 8 cup mark.
 Place this over medium flame (no higher) and allow to come to a simmer. (If you have an electric coil stove you should have a wire star to prevent actual contact with the coil, though I have seen people use these directly on the coil before)
 Once the water in the lower pot comes to a simmer, run the filter rod under cold water and place it in the upper bowl. (the pebbly texture prevents the grounds from entering the lower bowl during the final siphoning)

 Place the ground coffee in the upper bowl. 1 TB per cup and an extra one for the pot for a total of 9 TB. (Your grind should be coarser than Auto-Drip grind, but not as coarse as French Press grind)
 Place the upper bowl on top of the lower bowl, then press gently and twist to the right to form a seal.
 Now it's a waiting game... as the water below begins to turn to vapor, the pressure will begin forcing the hot water up the tube and into the upper bowl. (it's all based on atmospheric pressure and water displacement, but am going to refrain from completely "geeking out")

Eventually, the water in the lower pot will drop lower than the end of the siphon tube... THIS is what you have been waiting for... The steam in the lower pot now has the ability to escape up the tube. As this steam bubbles up through the water and grounds in the upper bowl, it churns everything around, creating greater contact between the coffee and the water and as an added bonus, it keeps the water in the upper bowl at the correct brewing temperature of 195-200 degrees. How brilliant is that?
 Let it churn for 60 to 90 seconds.
Then simply remove the pot from the flame and allow it to cool... This is where the magic begins.
 As the lower pot cools, the steam that is left will begin to cool and condense, thus there is now less pressure in the lower bowl. The lower pressure below begins pulling the coffee infused liquid, in the upper pot, down into the lower pot in an effort to equalize.
 Now, since some steam escaped during the "churning", the pressure in the lower pot is actually "less" than what it displaced before. (I hope that made sense) As a result, there is more "suction" than there is water in the upper bowl, this leads to the gasping sound at the end as the lower pot sucks air in through the grounds as well. This little burst of drawn air at the end is powerful enough to "suck" the coffee grounds almost completely dry.
 Remove the upper bowl and lay it CAREFULLY in the sink...
 And there you have it..... Delicious coffee just like they made it back in the 30's... or as I like to call it "Coffee AND a show"
 Now, pour your self a nice cup of super rich and super smooth vacuum brew!
 Cin Cin!!
~~
The "Vaculator", or what is more commonly referred to as Vacuum pot or Siphon pot.
To me, this is the epitome of home coffee brewing. Sure, the Moka pot makes a nice cup of near espresso, and the French Press makes a deliciously rich cup of "joe" to accompany your dessert. I can even say, with no small amount of conviction, that "pour over drip" (though Chemex brewing takes some degree of finesse to perfect) is quite delicious. In fact, there are several brewing methods that produce delicious coffee, but I think vacuum brewing beats them all.
I think the reason I have never mentioned it before, is that I have taken it for granted over the years. You see, I have a Bodum Electric Santos (Sold under the Starbucks Utopia label back in 1999) that was gifted to me by a friend when I helped him move. I had never seen a vacuum pot before, but once I brewed coffee in it, the auto drip I had been using quickly went bye-bye, for it brewed a vastly superior cup of coffee. One that truly lived up to the label on the pot. For that first cup was "Utopia".

There is only 1 coffee pot that I can think of that brews a better cup of coffee.... and that would be this art deco era beauty right here.

Sadly, the Cory company went defunct decades ago. (though Silex made these as well) The reason was two fold... First there was the rise of the Auto Drip coffee maker. Let's face it, automatic brewing machines are a lot easier to use than a manual stove top coffee maker. I don't know about you, but personally; there is NO WAY that I am capable of manually making coffee in the morning... It's like Dawn of the Dead around here until the first cup of coffee has been consumed.
While I have no doubt that auto-brewing was at least partially responsible, I believe the main reason for the demise of the vacuum brewer was that it's greatest attribute was also it's greatest weakness.....It's made of glass; completely from glass. Even though it's made of Pyrex's borosilicate heat resistant glass which is virtually impervious to thermal shock, it's not resistant to shocks in the kitchen. One false move with the siphon tube while cleaning the upper bowl and you have a lovely pile of coffee ground covered shards in your sink. But for me, the superior quality of the finished brew far outweighs the extra care that is needed during clean up.
My vacuum pot is significantly older than I am.... Actually, it's significantly older than my parents too. As a result of it's advanced age the rubber seal on the upper bowl has become hard as a rock. It softens to a more pliable state once it has been warmed, but it still doesn't form a good seal anymore...It IS 75-80 years old after all. There is an online source (DaySeal) where you can order new gaskets for $25, but I figured out a temporary fix. So, if you happen to have one of these pots and the gasket is hard (not cracked) then I am going to show you a little trick to make your pot work almost like new. After all, it is a sad thing to leave one of these beauties boxed away and unable to fulfill it's coffee brewing destiny.
All you need are 3 Rubber bands from Asparagus you bought this last spring. (you save your produce rubber bands, right?)

Slide one of them over the gasket and move it up towards the point where the upper part of the gasket touches the bottom of the bowl. (It is important not to twist the rubber band in any way)


Fill the bottom pot with water, no higher than the DRL printed on the bottom pot... In my case, this is the 8 cup mark.


Eventually, the water in the lower pot will drop lower than the end of the siphon tube... THIS is what you have been waiting for... The steam in the lower pot now has the ability to escape up the tube. As this steam bubbles up through the water and grounds in the upper bowl, it churns everything around, creating greater contact between the coffee and the water and as an added bonus, it keeps the water in the upper bowl at the correct brewing temperature of 195-200 degrees. How brilliant is that?

Then simply remove the pot from the flame and allow it to cool... This is where the magic begins.


~~
Subscribe to:
Posts (Atom)