I have noticed that something is missing from a lot of recipes… I see Paula using butter, butter and more butter. It’s her signature.
I see others taking a healthier stance, such as Giada or Alton, by adding just a touch of butter to olive oil in order to increase flavor quotient. And while I applaud their approach, they are missing one of the greatest flavor enhancements that can be added to ANY dish… I am speaking of “Browned Butter”, or as it is known in France… Beurre Noisette.
It requires such a small amount of time, but the return on investment is immeasurable. And yet, on most of the cooking shows I see, a simple pat of butter mixed with a little olive oil seems to be the BIG flavor enhancement. Well, except for Paula, whose obsession for packing as much butter into a recipe as possible is legendary. (I love you Paula!!!)
It's been said many times that "Everything is Better with Butter", but I say "Butter may be Better, but Browned Butter is Best".
Why am I making such a big deal about this? Well, if you would like to add a deep, toasted, nutty flavor to your next dish, then browned butter is for you… Browned butter contains less water, and water “waters” down the flavor of butter; thusly, less browned butter is needed to achieve more intense flavor.
What do you do with browned butter? Well, it is excellent, believe it or not, with fruits, such as pears and apples. It pairs well with Brussels Sprouts, Cauliflower, Winter Squash, Green Beans and makes the best Mashed Potatoes on earth. It creates a phenomenal Hollandaise and many other sauces based on roux. It’s divine with fish, seafood and shellfish. Substituted for olive oil in the Soffritto (sauté) of a simple Lemon Risotto to add that “extra something” that people can’t really put their finger on. And lets not forget desserts, brushed over croissant, between sheets of filo for baklava or drizzled over the filling of an apple pie. In conclusion, it will take your culinary delights to the next level.
The process is simple. Place butter in a small saucepan over low heat, the butter will, of course, melt. It will begin to “Boil” as the water in the butter turns to steam and escapes… at this point, begin watching the pan…. You will see the milk solids separating out and dropping to the bottom of the pan, allow these to brown slightly. Swirl the pan a little… As soon as you notice that the liquid butterfat is becoming a light golden brown color, remove the pan from the heat and let it set for about 10 minutes… It will continue to brown slightly. Strain through a couple layers of cheesecloth and Voila!!!You have one of the most powerful players in your flavor arsenal.
 1 garlic clove; minced fine
4 sage leaves, minced; plus extra for garnishing
4 TB Unsalted Butter
1 lb Potato Gnocchi
Begin by heating the water to cook the gnocchi
Meanwhile place 4 TB butter to a small saucepan and set over low flame.
Once the butter begins to brown, remove from heat and let set for 5 minutes.
Prepare cheesecloth for straining.
Strain browned butter through cheesecloth and add garlic and sage.

Leave this to steep a little while cooking the gnocchi in salted boiling water.
When the gnocchi begin to float, remove them from the water to a bowl.
Place a large skillet over medium heat.
Pour in the browned butter/sage/garlic and heat.
 Once the butter is hot, toss the gnocchi into the pan and sear.
 Toss the pan occasionally, until the gnocchi begin to brown slightly.
 Remove from heat and divide between 4 bowls.
Sprinkle with a little more minced sage.
Garnish with a sage tip.
Mangia!!
~~
I see others taking a healthier stance, such as Giada or Alton, by adding just a touch of butter to olive oil in order to increase flavor quotient. And while I applaud their approach, they are missing one of the greatest flavor enhancements that can be added to ANY dish… I am speaking of “Browned Butter”, or as it is known in France… Beurre Noisette.
It requires such a small amount of time, but the return on investment is immeasurable. And yet, on most of the cooking shows I see, a simple pat of butter mixed with a little olive oil seems to be the BIG flavor enhancement. Well, except for Paula, whose obsession for packing as much butter into a recipe as possible is legendary. (I love you Paula!!!)
It's been said many times that "Everything is Better with Butter", but I say "Butter may be Better, but Browned Butter is Best".
Why am I making such a big deal about this? Well, if you would like to add a deep, toasted, nutty flavor to your next dish, then browned butter is for you… Browned butter contains less water, and water “waters” down the flavor of butter; thusly, less browned butter is needed to achieve more intense flavor.
What do you do with browned butter? Well, it is excellent, believe it or not, with fruits, such as pears and apples. It pairs well with Brussels Sprouts, Cauliflower, Winter Squash, Green Beans and makes the best Mashed Potatoes on earth. It creates a phenomenal Hollandaise and many other sauces based on roux. It’s divine with fish, seafood and shellfish. Substituted for olive oil in the Soffritto (sauté) of a simple Lemon Risotto to add that “extra something” that people can’t really put their finger on. And lets not forget desserts, brushed over croissant, between sheets of filo for baklava or drizzled over the filling of an apple pie. In conclusion, it will take your culinary delights to the next level.
The process is simple. Place butter in a small saucepan over low heat, the butter will, of course, melt. It will begin to “Boil” as the water in the butter turns to steam and escapes… at this point, begin watching the pan…. You will see the milk solids separating out and dropping to the bottom of the pan, allow these to brown slightly. Swirl the pan a little… As soon as you notice that the liquid butterfat is becoming a light golden brown color, remove the pan from the heat and let it set for about 10 minutes… It will continue to brown slightly. Strain through a couple layers of cheesecloth and Voila!!!You have one of the most powerful players in your flavor arsenal.
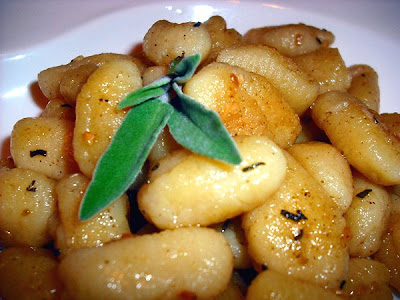
Pan fried Gnocchi in Sage Brown Butter

4 sage leaves, minced; plus extra for garnishing
4 TB Unsalted Butter
1 lb Potato Gnocchi
Begin by heating the water to cook the gnocchi
Meanwhile place 4 TB butter to a small saucepan and set over low flame.
Once the butter begins to brown, remove from heat and let set for 5 minutes.
Prepare cheesecloth for straining.
Strain browned butter through cheesecloth and add garlic and sage.

Leave this to steep a little while cooking the gnocchi in salted boiling water.
When the gnocchi begin to float, remove them from the water to a bowl.
Place a large skillet over medium heat.
Pour in the browned butter/sage/garlic and heat.
 Once the butter is hot, toss the gnocchi into the pan and sear.
 Toss the pan occasionally, until the gnocchi begin to brown slightly.
 Remove from heat and divide between 4 bowls.
Sprinkle with a little more minced sage.
Garnish with a sage tip.
Mangia!!
~~


