Friday, December 31, 2010

On A Roll - Grandma's Pumpkin Roll

Into everyone's life, a pumpkin roll must fall.  It's simply the way of the universe; some sort of cosmic certainty, directly related to the force of gravity I am sure. Grandma's Pumpkin roll has always been a holiday treat.  We waited with great anticipation all year for it's return during the holiday season.

I was recently in The Dalles visiting granma Reva when I inquired about her recipe.  She presented me with a very old, very yellowed newspaper clipping from the Dalles Chronicle.  So I copied it down and am sharing it with you.  I don't know exactly how old the recipe is, but I can tell you it's older than I am, cause I stopped aging once I hit "Jack Benny" (39).  LOL

Grandma's Pumpkin Roll

3 Large Eggs
3/4 cup (3.4 oz) (100 g) AP Flour
1 tsp Baking Powder
2 tsp Cinnamon
1 tsp Ginger
1/2 tsp Nutmeg
1/2 tsp Kosher Salt
1 cup (7.1 oz) (200g) Granulated Sugar
2/3 cup (5.5 oz) (160 g) Pumpkin Puree
1 tsp Lemon Juice
1 cup (4 oz) (120 g) Pecans, chopped Plus a few extra halves for garnishing

Filling:
4 oz Unsalted Butter
6 oz Cream Cheese
1/2 tsp Vanilla Extract
1 cup (3.5 oz) (95 g) Confectioners' Sugar (sifted, before measuring)

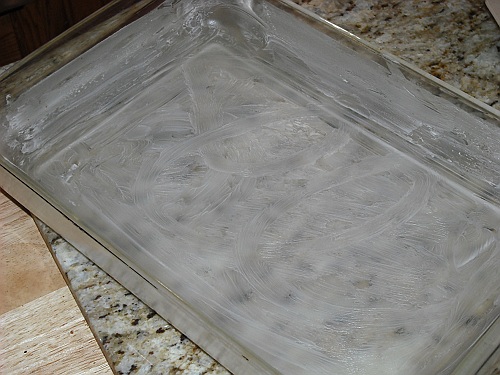
Preheat your Oven to 350F degrees, then grease and flour a 10 1/4 x 15 1/4 jelly roll pan and set it aside.

Beat the Eggs on high speed for 5 minutes until pale and increased in volume.

Meanwhile, whisk the Flour, Baking Powder, Cinnamon, Ginger, Nutmeg and Salt together in a bowl, then set aside.

and chop the pecans.

Gradually add the sugar, 1 TB at a time, while continuing to beat the eggs.

Stir in the Pumpkin Puree and the Lemon Juice.

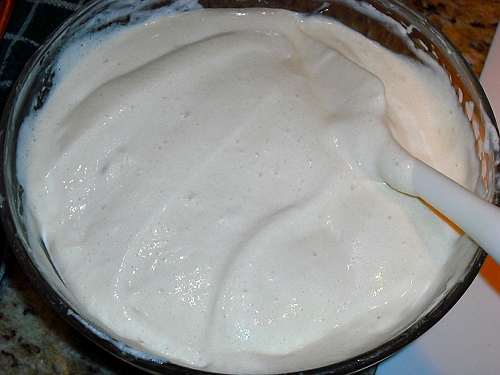
Fold in the Flour mixture.

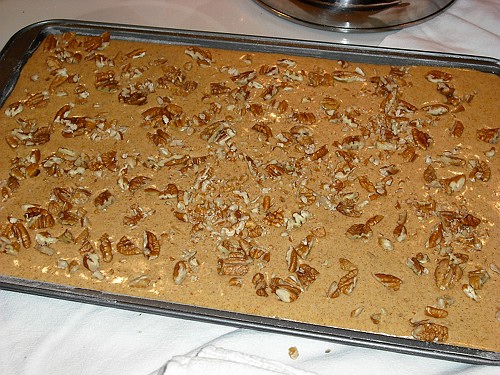
Pour into a greased and floured jelly roll pan. (10 1/2 x 15 is the size Grandma uses)

Sprinkle with chopped pecans.

Bake for 15 minutes or until cake springs back to the touch.

While it's baking, make the filling by beating Butter, Cream Cheese and Vanilla extract until fluffy.

Add sifted Confectioner's sugar a little at a time, until fully incorporated, set filling aside.

When the the cake is done, immediately lay a tea towel over the pan,

Place the cooling rack on top of the towel and flip the whole thing over.

Remove the pan, and lay another tea towel over the "bottom" of the cake,

Invert the jelly roll pan and lay it on top of the tea towel (so the bottom of the pan is laying against the towel)

Flip the whole thing over again (so the nut side is up), remove the cooling rack and commence with rolling the cake up, tea towels and all.

Pin the end closed to hold the shape, then let cool 5 minutes.

Unroll the cake and spread the filling over the cake. (leaving a 1 inch margin of uncovered cake at each end)

Immediately re-roll the cake and wrap in one of the tea towels,

Clamp the ends to help it hold it's shape and chill for 2 hours.

After the 2 hour chill time, you can either serve, or store for several days wrapped in plastic wrap.

Serve with a light dusting of confectioners' Sugar or Brandied Whipped Cream.

I usually go for the Brandy in the Whipped Cream....  :)

Mangia!!
~~

Thursday, December 30, 2010

Ready, Willing and Æble - Æbleskiver (Ebelskiver)

Woe to the "pancake puff".... (American reinvention, repackaging and mass marketing as it's finest)  OYE!

Let me give ya a little "Danish History" regarding Aebleskiver ('aebleskive' being the singular form). Truth be known, I don't think anyone really knows how or why these Danish treats have taken on a spherical form.  Maybe it's because Danes are such well rounded individuals and it shows in their food.  ;)  har-dee-har-har

Oh there are legends aplenty, especially on the internet, about vikings doing their "triple P" thing, (Plundering, Pillaging and Pilfering) all resulting in several dented shields and/or horned helmets.  After which, since it must have been an early morning raid and the cook just happened to forget the pots and pans, they resorted to cooking pancakes on their dented shields and helmets.  Since the batter naturally ran into the dents, you have the first aebleskiver.  Hmmmmmm.  I find this fairly unlikely, since most Viking era shields were made of wood planks held together with bands of metal.  Wood does not make a good cooking vessel, especially over an open fire. Then again, Vikings didn't have horns on their helmets either.  Those were products of romantic period art, drawing on ancient Greek descriptions of ceremonial dress.  I know, Blah blah blah blah.... LOL

More than likely, since the Nederlands and Denmark are so close in proximity, the Dutch Poffertjes simply made their way north....  Either that, or the Aebleskiver made it's way south.  One or the other.  Though Poffertjes tend to be more ovoid in shape, rather than spherical, the idea is the same.  And just as Proffertjes require a special pan, so to does an Aebleskive.  I am not sure if the Proffertjes pan has a specific name, but an Aebleskiver pan is called a "munk" pan, and is also used to cook Munker (a yeasted batter) as well as Aebleskiver (baking soda and egg white batter).  Which also begs the question, "Which came first, the Munker or the Aebleskiver?" These pans are usually made of cast iron though there are non-stick aluminum versions available at Fantes and there is even an "Electric Skillet" version floating around on the net.

Dubious historical data aside, and probably more information about Vikings than anyone would want to know before breakfast, I just wanted to set the record straight regarding this silly "pancake puff" thing.  It's not a new idea, its been around for centuries... and personally, since I was an idiot and bought one so I could cook 14 at a time instead of only 7, those pans are terrible.  They heat unevenly and casting is so bad it will take eons for them to become properly seasoned. (I gave it to the Goodwill and spent 8 dollars less on a decent one from Fantes)

So what exactly is this Aebleskiver?  Aebleskivers are as sort of hybrid between a doughnut and a pancake with a little bit of waffle DNA thrown in for good measure.  I have heard, and read, that they are traditionally filled with apple slices or jelly.  Personally, I have never had, nor made, them that way but I am intrigued by the idea, however suspicious I may be about sticky goo winding up in the bottom of my Monk pan.  The dents, or holes are about 2 1/4 inches across and about 1 inch deep, giving you a nice "almost" golf ball sized hunk of fried, butter rich, pancake batter that is perfect with a dusting of confectioners' sugar and served along side raspberry preserves, or your favorite cane berry. (though my personal favorites are bilberry, huckleberry or marionberry)

Growing up, these were the presage of Christmas to come, for they were, and are, part of a nutritious Christmas Eve morning's breakfast.  We all knew that once the Aebleskivers hit the table, it was only 24 hours before Christmas morning arrived.  Santa would be coming down the chimney and the stockings would be filled with all sorts of hard to find winter goodies, like tangerines, nuts, various dried fruits and such. (modern day shipping has made these special winter treats more commonplace in cold climates than they were when I was a young pup)

So let's hear it for the Æbleskiver! (pronounced AY-blah-skee-wah)  The herald of Christmas!

Æbleskiver

2 Large Eggs - Separated (or 3 Medium Eggs)
1 tsp Granulated Sugar
2 cups of Buttermilk
3 TB Melted Butter
1/2 tsp salt
2 1/2 Cups AP-Flour
1 1/4 tsp Baking Soda
1/2 tsp Mace
1/4 tsp Cardamom
1/2 tsp Cream of Tarter

Separate the eggs, whisking the yolks to break them up a little. (I always separate the yolks into a pouring pitcher)

Then add the sugar to the yolks and whisk until pale and thick.

Add Buttermilk, Melted Butter and Salt, stirring until well combined

In a separate bowl, mix flour, baking soda, and spices with a whisk.

Add flour mixture to the egg yolk mixture and stir until smooth.

In another clean bowl, beat egg whites with cream of tarter until stiff peaks form.

Fold egg whites into batter in two batches.

Warm aebleskiver pan on medium heat (You will probably have to adjust heat after the first batch, I always burn the first batch)
Add a small amount of vegetable oil, butter or lard to each one of the seven indentions.

Fill each indention only about 2/3 full.

(trust me, they will raise and fill the holes)

Cook until bubbly on top (3-4 minutes), just like regular pancakes, then, utilizing the traditional knitting needle, a bamboo skewer, or my favorite, a fondue fork,

turn the dough balls over to obtain a round shape. (This takes a little practice)

Cook an additional 2-3 minutes.

Dust with confectioners' sugar.

Serve with traditional Raspberry preserves (or Bilberry) and confectioners' sugar.

Lingonberry, while Swedish, also goes very nicely as well as Black Current and, as I mentioned, Hucklberry, Marionberry or Bilberry.
They may also be served in American fashion with Maple syrup (I prefer Grade B to Grade A Dark amber)

Glædelig Jul og Godt Nytår!!

Spis!!  er, I mean...  Mangia!!
~~

Tuesday, December 28, 2010

Rocky Road (Candy)... Take Me Home... To The Place... I Belong

I really didn't blog about candy all that much this year.  Oh, there was Fudge a plenty (which I blogged about last year) and of course, the Honey Caramels, which I covered this year.  Then I decided to do a recap on Divinity with the more traditional Black Walnuts.  But two of the Christmas treats I forgot to mention, both this year and last, were Great Grandma Ruby's Silver Drip (Which I will get to in a later post) and Grandma Reva's Rocky Road.  No, I am not talking about the Ice Cream flavor.

When I was a child, Rocky Road was the paramount Christmas candy.  What kid doesn't love marshmallows?  Combine that with Chocolate Fudge and Nuts and you have a candy that is destined to disappear as fast as you can make it.

Now that I am older, I am not so much into marshmallows, so after one piece I am pretty much done for the year, but many many other members of my family enjoy this delectable candy, immensely.  Thus it is still a holiday staple 'round these parts.  

The base fudge is the same as the gelatin fudge I blogged about last year, which has been profusely laced with both Walnuts and Mini-Marshmallows, making it all lumpy & bumpy... Ergo - Rocky Road.

Rocky Road Candy

3 oz Unsweetened Baker's Chocolate
3 cups Granulated Sugar
1 TB unflavored Gelatin
1/2 'Scant' cup Corn Syrup (I am figuring this at about 120 ml instead of 124 ml)
1/2 tsp Kosher Salt
1 cup Whole Milk
1 1/4 cup (20 TB) (10 oz) Unsalted Butter (This is definitely NOT a low fat dessert)
1 1/2 tsp Vanilla Extract
4 oz chopped Walnuts (or Almonds)
4 oz Mini-Marshmallows

Chop the Chocolate with a sharp, heavy knife.

In a large, heavy bottomed pot, whisk the Sugar and the Gelatin together.

Add Corn Syrup, Salt, Milk and Butter.... along with the chopped Chocolate.

Apply Medium heat to the whole "mess" and stir while everything comes to a boil (this prevents scorching)


When the mixture comes to a boil, cover with the lid to wash the crystals down from the the side of the pan.

Remove cover after 5 minutes and insert a candy thermometer.

Cook the mixture to 235 degrees (soft ball)

Meanwhile, pour vanilla into the bottom of a mixing bowl.

And "butter" a 13 x 9 baking dish.

When the mixture reaches 235 degrees, remove from heat, remove the thermometer and pour the "syrup" over the vanilla (in the mixing bowl)

Let this sit for 25 minutes. (don't worry about the "110" degree thing as is standard with most fudge)
After 25 minutes (regardless of the temperature) begin beating the fudge at medium-low speed, for 15 minutes (sometimes it takes a minute or two longer)

When the mixture looses most of it's shine, stop beating and remove from the mixer stand, then stir in the nuts......

Then fold in the Mini-Marshmallows. (They will melt into the candy, just a little)

Pour the mixture into the prepared baking dish and spread somewhat evenly. (This will be a little hard, since it's all lumpy)

Let set for 3 hours, until fully set before cutting into squares and prying out of the pan with a bench scraper (it just works easier)

While you are waiting, you can let your niece (or nephew) lick the bowl.

And Serve......

Or store in a metal container, lined with waxed paper in the refrigerator for up to a month. (It never lasts that long)

Mangia!!
~~